 ENGLISH
 РУССКИЙ
 DEUTSCH
 中文(简体)(简体)

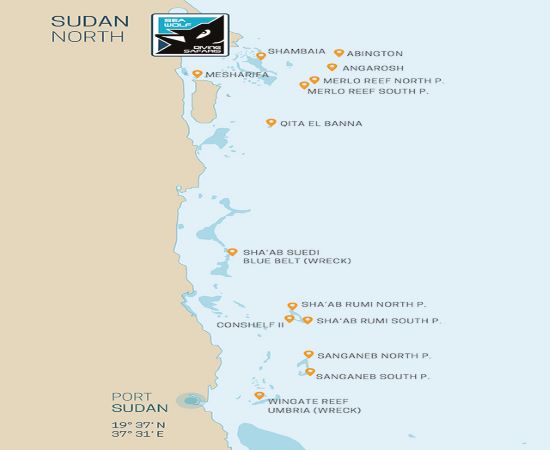
Sudan North
- Between Angarosh, the mother of sharks ( that's the Arabic translation), Rumi, the reef of Jaques Cousteau and Wingate Reef, where the Umbria is located, you will find a breathtaking, untouched underwater world.
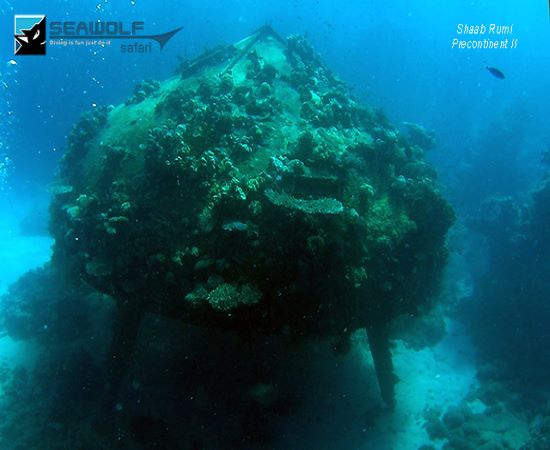
- It is not without reason that Jacques Cousteau built his Precontinent II in Sudan. The underwater research village can still be dived today and is one of the highlights of this tour. Even though the buildings are impressive, you should never forget to look into the blue water.
- Often you will encounter currents with schools of hammerhead, grey, white and black tip reef sharks.
Expect to see


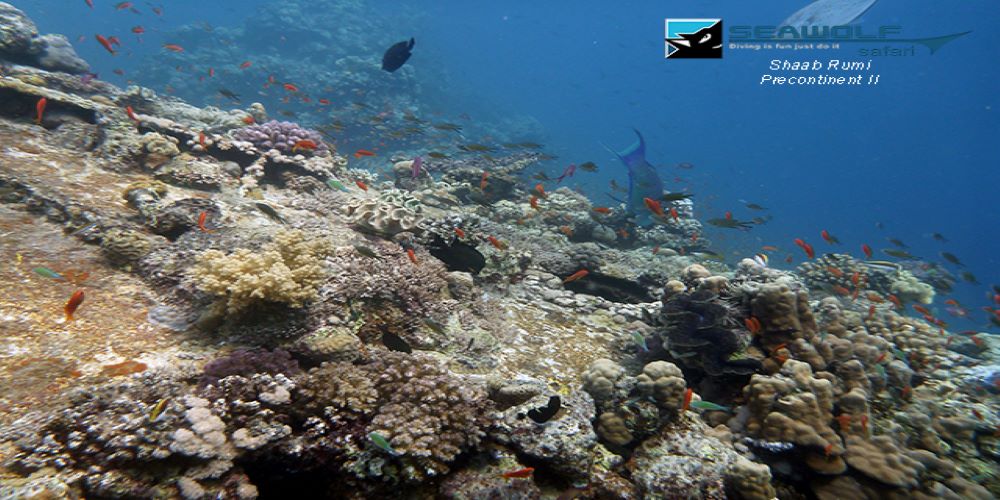
Shaab Rumi
The east side
With the intermittent current, nice drift dives can be made on this side. The reef wall drops steeply into the deep blue. At the southern end of the east side the diver will find a narrow slope from 20 meters. At 30 and 60 meters respectively, small step-like ledges nestle into the slope. The entire wall is beautifully vegetated and huge gorgonians stretch their fans into the current. Vermillion seabass and butterflyfish stand close to the reef. Schools of copper snapper and spiny mackerel move along the wall. Especially in the morning hours pelagic big fishes come up from the depth. On a dive, in addition to various species of sharks, manta rays can occasionally be encountered. At the south end, in the area of the plateau approach, a small collection of anemones can be admired in the shallows. Due to the attractive south plateau, dives on the east side are rarely made.
The north plateau
The frequent northerly current provides a nice growth of stony and soft corals on the three-stepped plateau. The first ledge is in shallow water at 3 to 4 meters water depth. Numerous surgeonfish and various butterflyfish populate the poorly vegetated reef top. Down to a depth of 12 meters there is a sloping slope, which is populated with colonies of white and blue staghorn corals. At the foot of this slope is the second plateau. It descends steadily to 30 meters and is covered with numerous soft corals. The abundance of fish on the plateau is not as great as on the steep wall, where numerous fish and other reef inhabitants fill the corals with bustling life. Below a slope, at a depth of about 60 meters, begins the third stage, on the northern end of which stands a larger coral pile. In the channel between the pile and the slope sometimes silhouettes of hammerhead sharks can be seen. Especially in the period from late summer to autumn, they often move beyond the limits accessible to the recreational diver. On the east side, in the shallower area, schooling fish such as spiny mackerel, copper snapper and red sea fusiliers swim along the reef.
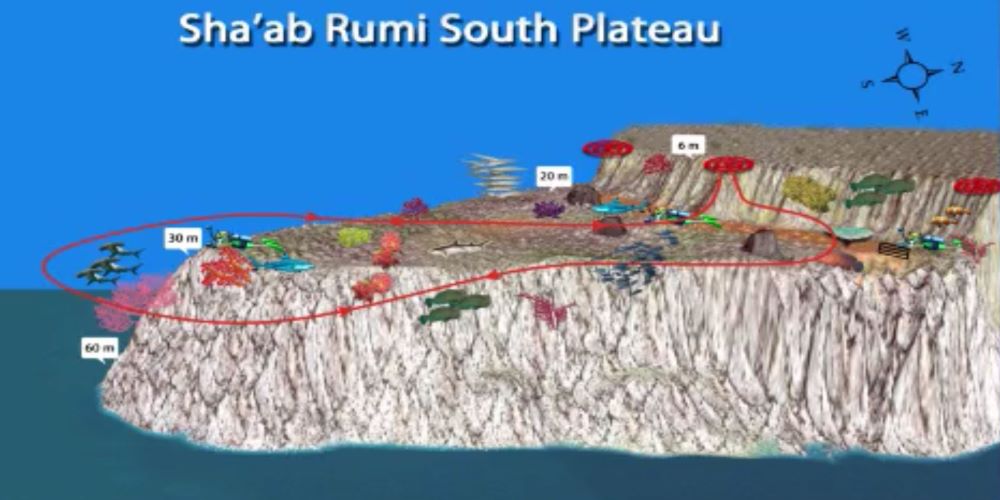
Shaab Rumi South Plateau with Precontinent II
There is a diversity of colors and species that make this dive an unforgettable experience. The reef wall is craggy on the upper 15 to 20 meters and forms numerous caves and crevices. Below this is the tongue-shaped plateau, which descends to 30 meters. Parallel to its base is a small channel. The outer side, covered with numerous hard corals, slopes steeply into the depths.
The southwest tip forms an attraction of this site: A school of scalloped hammerhead sharks frequently patrols the open water. If you dive out into the blue a bit, with a little luck you can observe these reserved sea creatures.However, care should be taken not to swim frantically towards them, otherwise the shy hunters will quickly return to the depths. But be careful: the current can pull you very quickly into the open water without giving you the chance to reach the reef again under your own power.
After a trip to the southern tip, the plateau can then be explored in all its glory. In the center is a mushroom-like, beautifully overgrown coral block. The bottom is covered with gorgonians, leather corals and stony corals, where scorpionfish are lurking for prey swimming by.
At the eastern plateau approach lies an old shark cage, which belongs to the Precontinent II project. Next to it is a plaque commemorating an Austrian diver who died in an accident in 1993.A very trusting school of sweetlips makes this spot a dream for every underwater photographer. With a trained eye and a bit of luck you can also spot a stonefish, which is well camouflaged and lurking for prey.In the shallow area you may encounter grey reef sharks, which move together with white tip reef sharks over the plateau. Sometimes dolphins also pay a visit to the reef.
new_lg.jpg)
Sanganeb South/West/North
The south side with the southwest plateau
The most dives are done on the southwest plateau.
The south side forms a vertical reef wall down to a depth of 10 meters and changes into a sloping hillside below. The upper area is craggy and forms numerous small caves and crevices. Above forests of leather coral, one encounters porcupinefish.
The southwest plateau follows to the west. On its base, at a depth of 10 to 15 meters, there are large table corals. Numerous whip corals rise from the bottom, some of them forming entire forests. With such an abundance of species, it is difficult to decide in which direction to continue the dive. On the one hand the pulsating life on the plateau attracts, on the other hand in the area of the edge, as also at the whole outer wall of the reef, grey reef sharks, black tip and hammerhead sharks can be encountered. With a little luck, sea turtles or passing manta rays can be spotted.
The outer edge of the plateau starts at its base at 10 meters and drops to about 33 meters at the extreme southwest tip. At this point, the very craggy outer wall runs almost vertically and forms overhangs. A number of small coral columns, some of which are beautifully covered with purple soft corals, invite you to observe and photograph them. A large swarm of barracudas, which is loyal to its location, makes its circles. It is so trusting that a careful diver can swim up to arm's length to individual animals. A huge school of spiny mackerel is also common. Vermillion seabass occur in this coral garden in limitless numbers. A variety of sponges, leather corals, gorgonians and fire corals settle on the bottom. At the foot of the upper reef wall, a sandy strip runs along the plateau, where large green giant triggerfish have dug their nests into the sand. Caution is advised there as they aggressively defend their nests. The reef wall above the plateau base is so crevassed up to 10 meters that canyons have formed. They are easy to dive.
North plateau
Directly adjacent to the northern tip is an elongated plateau.
The approach to the plateau starts at a depth of 4 meters. Due to the swell and the often stronger currents, it is rarely suitable for diving. However, from its outer edge you can beautifully observe the many small reef fish swimming around in the play of the waves.
Below the first step there is a beautiful slope covered with soft and hard corals. It flows into a channel at a depth of 25 meters. The often strong current makes it impossible to swim against it.
To the north, the plateau rises again to 20 meters and then becomes a steep drop-off. Along the outer side shoals of spiny mackerels, fusiliers and copper snappers pass by. Below them soft corals sway in the current.
The slope offers a magnificent sight. It is covered with numerous soft corals and fan corals that stretch their bodies into the open water.
In the shallower area you may encounter a shoal of barracuda or large groups of double spotted snappers....
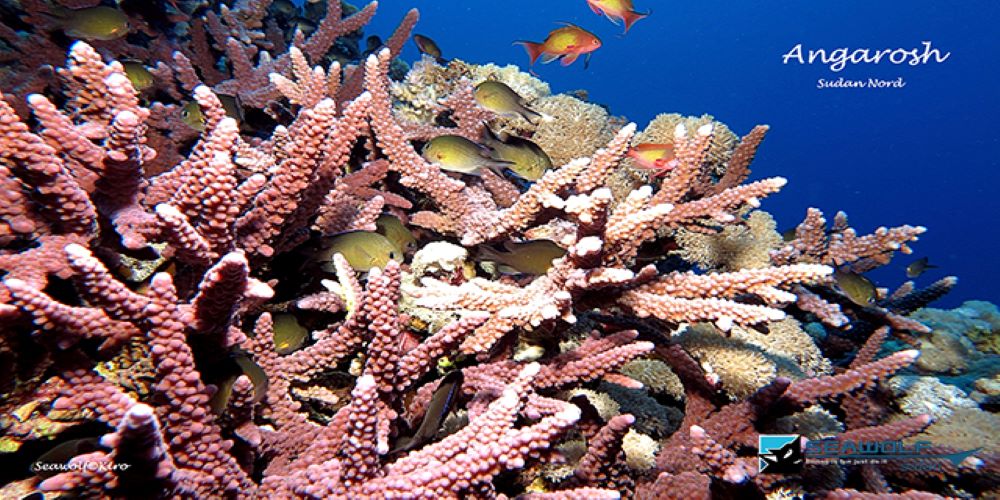
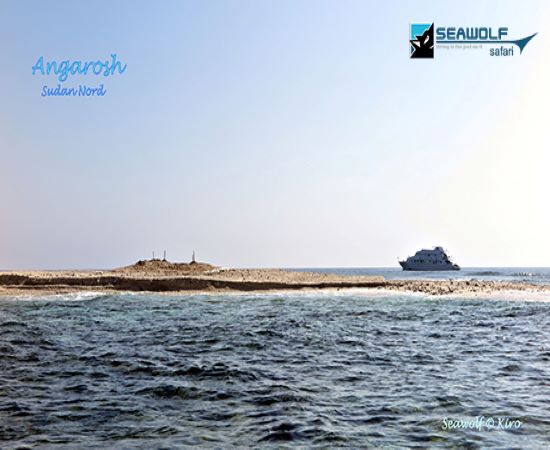
Angarosh
The island, which rises only a few meters out of the water, has an elongated shape and lies 2.5 nautical miles south-southwest of Abington Reef.
The surrounding reef has a rather triangular shape and drops steeply into the depths on its outer sides.
There is a small plateau at the south end and a large plateau at the north end. Both places are known for possible encounters with different shark species. The number of animals depends on the season and water temperature.
Due to the exposed position, strong currents must be expected. This is also a reason why strikingly large schools of different pelagic fishes can be found.
North plateau with east side
At the north end facing north-east is the large plateau. At its base in 18 meters depth there is a large cave in the reef wall, which is bravely defended by two pairs of anemone fish.
The plateau descends evenly to 30 meters, continuing after a ledge at 40 meters.
Whip corals rise up and form almost small forests in some places. Often a swarm of barracudas circles here.
Especially at the tip of the plateau you have to expect strong currents. If the diver nevertheless manages to reach the edge, he can meet the sea creatures that have made this dive site so famous, especially in the morning hours.
Depending on the direction of the current, it is possible to dive on the east side of the reef. It would be a pity to just do the ascend of your dive here, because there is also a lot to discover on this section of the reef.
South of the northern plateau, at 10 meters, there are several caves where schools of glassfish seek shelter. One of the first caves can be reached at a depth of 4 meters through a small chimney leading downwards. Through the actual entrance you can dive out of the cave again.
Not far from the plateau approach, the diver comes across a larger coral block that is virtually overgrown with anemones. In the shallow water area, the entire colorful diversity of shapes and species that characterizes this area of water is displayed.
West wall with south plateau
In contrast to the east side, the west side is more strongly covered with crevices and overhangs.
Also striking are the accumulations of anemones, which attract the attention of the diver with their symbiotic clownfish.
Similar to the east side, the reef wall runs vertically up to 20 meters. Partly it is overhanging and in 40 meters it changes into a small sloping hillside. Cornetfish can be observed below the water surface.
Towards the south plateau, blue redtooth triggerfish stand out, swimming close to the reef wall in large numbers. Around the south end there is a narrow shallow water strip, but due to the swell it is too shallow for diving or snorkeling. It is populated with a variety of colorful reef life.
Below this section there are larger caves in the reef wall. The small plateau descends in two steps to a depth of 45 meters. On the first step there are some nice overgrown coral blocks at about 20 meters. At the level of the second one the area of the pelagic big fishes begins. Depending on the season there is a good chance to meet different species of sharks.
Qita el Banna
The southeast side
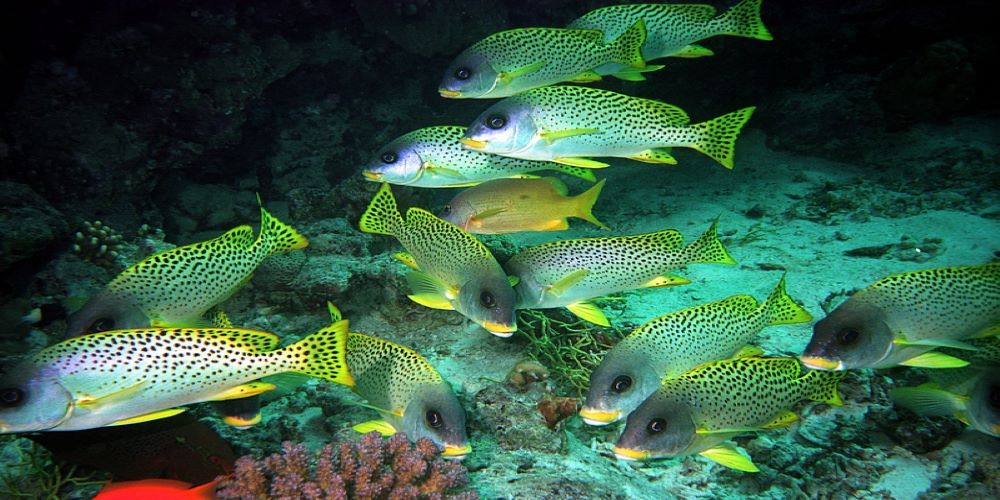
The highly rugged reef wall is overhanging in places on the upper 15 meters. Many small canyons have formed along the wall where soldier fish seek cover. The diver may encounter groups of giant sweetlips moving along the slope - an attractive subject for underwater photographers.
At the southern end of the wall, a slope extends to a depth of 40 meters. Below it lies a large cave. On the partly sandy bottom of the cave rest whitetip reef sharks. Colorful coral formations and the seemingly bottomless depth captivate the visitor. However, it tempts to forget about time and depth. Due to the numerous schooling fishes, such as vermillion seabass, and the many small caves, the shallower area also has a lot of interesting things to offer.
West side with north plateau
The west side drops steeply to a depth of over 70 meters. The steep drop is interrupted at a depth of 40 meters by a small plateau. Similar to the east side, the reef wall is strongly cragged on the upper 10 meters, where small caves have formed. In these, various coral dwellers can be spotted.
Shoals of reef fish, such as doctor fish or yellow head snapper, move along the entire reef wall. Large gorgonians stretch their fans into the current to filter out planktonic organisms from the water.
At the north end of Qita 'el Banna is a small plateau covered with coral heads. It begins at a depth of 10 meters, descends gently and ends at its outer edge in a steep wall. If the diver looks at this edge into the depth or into the open water, there is a good chance to spot large pelagic marine life.

Merlo Reef
West side
On the west side you can see the remains of the Freedom from far away. The Austrian safari boat ran into the reef due to a navigation error in October 1999. The ship was almost completely stripped by local fishermen within a few days - in the meantime only the stripped hull and the sawed off bow can be seen. The Merlo Reef is frequently visited by safari boats. Because of its exposed position, currents must be expected here as well, although they are usually not as strong as at Abington Reef.
East side
The reef wall is partly overhanging to a depth of about 15 meters.
In this area the reef is very rugged with many crevices. Numerous giant moray eels find a hiding place there and wait for the night to stalk their prey under cover of darkness. Some crevices are so large that it is easy to dive into them.
Inside, scattered coral dwellers can be spotted in the diffused light, hiding from their enemies. At the foot of the wall begins a slightly downward inclined slope with beautiful vegetation. It is littered with small to medium sized coral blocks and populated by many reef dwellers. The coral growth is so dense that only small sandy areas can be found on which occasional whitetip sharks rest.
In addition to the various species of hard and soft corals, there are a large number of table corals spread over the entire eastern side.
Colonies of splendid and bubble anemones have settled next to them and schools of unicorn fish swim on the slope. At its end, the outer wall drops steeply into the depths. The edge runs north at a depth of about 40 meters and rises to the south to the 25 meter range. In this section, groups of napoleons move along the reef and curiously approach the divers swimming by.
At the northern tip is a three-level plateau. The first level covers the shallow water area to a depth of 2 meters. On the west side, two deep cuts can be easily dived and under a small overhang at 15 meters is a school of glassfish. At the foot of a craggy reef wall, the second stage begins in 25 meters. The bottom drops deep to 30 meters to turn into a steep wall. The plateau is nicely vegetated, but dominated by a large coral rock on the west side. It is beautifully overgrown with soft and hard corals and offers interesting motifs for underwater photographers. Below it, the third plateau level can be spotted.
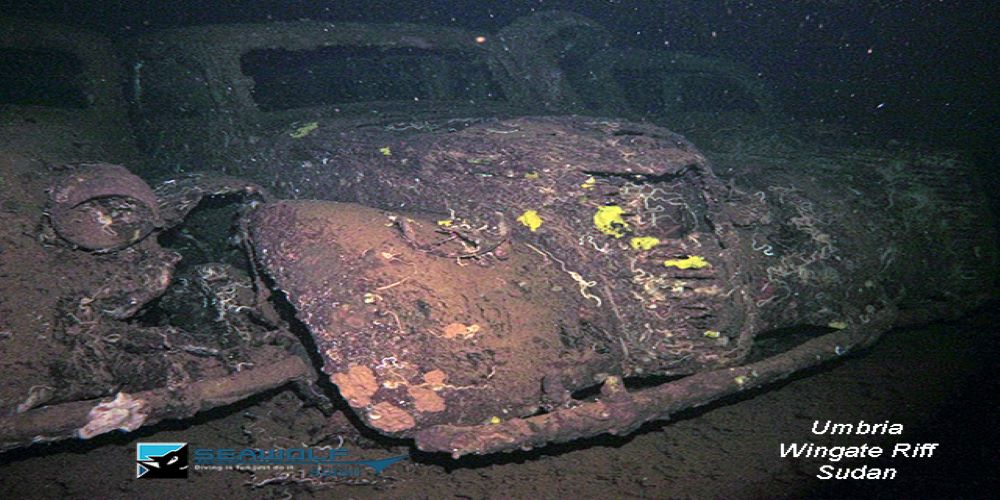
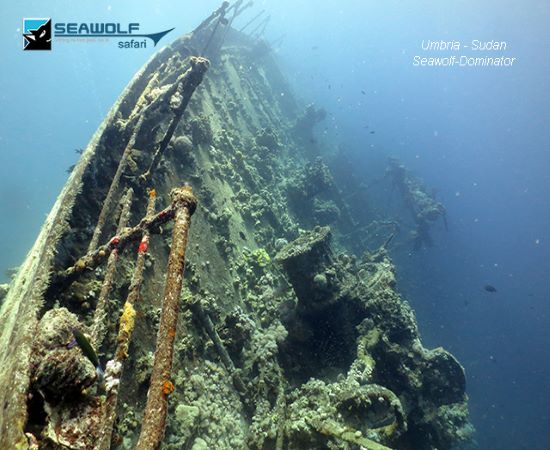
Wingate Reef with Umbria
Despite the dangerous situation in the harbor entrance of Port Sudan, the "Umbria" is not salvaged. A no-go zone is declared around the wreck with some of its davits still sticking out of the water and it is then left to its own devices.
Nine years after her sinking, the "Umbria" arouses the interest of Hans Hass, then 30 years old. His contacts with the governor of Port Sudan finally enable him to dive on the "Umbria".
His photo and film material contributed considerably to the myth of the wreck. In the meantime, the "Umbria" is one of the most famous wrecks in the Red Sea.
Located within sight of Port Sudan, it usually marks the beginning or end of a diving safari. Even though the collecting madness of many a diver has left its mark here, the old lady with the explosive cargo has lost none of her charm. The sinking site can be easily identified by the four davits sticking out of the water on the starboard side. The sediment-rich bottom, the immediate location to the harbor entrance, and the low currents often contribute to reduced visibility.
The wreck lies at an angle of 75° to the port side. The three forward holds adjoin the intact bow. Amidships are the crew quarters and the bridge. Towards the stern, two more holds and the aft deck follow. Both the cargo holds and the midship superstructure can be comfortably explored.
However, due to the extreme inclination and the dangerous cargo, extreme caution is advised when touching objects. If you approach the bow of the "Umbria" from the open water, the steeply rising bow with the flagpole stands out mystically in the greenish water.
The two anchor chains run to the bottom, as the "Umbria" was at anchor when she sank. The anchor winch and the railing are covered with coral.
Some of the deck planking is still in surprisingly good condition. The small cargo hatches are an indication of the ship's age. The first hold, accessed from the foredeck, contains the omnipresent munitions, wooden crates, electrical equipment and aircraft tires. The second, somewhat larger hold contains bombs, grenades, and stick grenades. The detonators, which are stored separately from the explosives, are scattered in almost every hold. The third hold is one of the most visited.
Besides cement bags and other building materials, wine bottles and jam jars are found here.
Through a narrow passage on the port or starboard side, the first cargo level leads to the midship area, where three vehicles are parked.
The Fiat 1100 Lunga were specially designed for off-road use in the Italian colonies. Unfortunately, several divers have already left their marks on the vehicles. The fine sediment makes visibility drop to zero after only a short time, so if possible this part of the ship should be visited with small groups at longer intervals. The midship section with the bridge and its superstructures can easily be explored by snorkeling. On the starboard side 4 empty davits protrude from the water. On this side is also a single bathroom with toilet, bathtub and an enamel sink.
The massive engine room is accessed either through one of the open skylights behind the funnel or through the workshop accessible from aft. The multi-level room is easy to dive in the upper sections, while the lower ones are reserved for experienced divers.
Grates border the numerous aggregates. On the seabed toward the port side of the superstructure are wind scoops, cargo booms, the broken chimney, and a lifeboat. Towards the stern, two more cargo holds are connected. They are partly covered by the fallen derricks. As in the front holds, munitions, construction material and various war equipment can be found here. The single-story superstructure between the fourth and fifth holds houses the galley and some stores. The stern is now without planking. The red soft coral on the railing as well as the deck strutting provides the necessary color. The steering gear and the exposed steering chain are clearly visible. Below the railing, the huge rudder blade and the starboard propeller are impressive. The port propeller has sunk into the floor. Beneath the rudder blade is a huge artificial cavern that can only be exited through two exits. The twilight contributes to a mystical atmosphere..

Umbria
Over 360,000 bombs and 60 boxes of fire bombs and other explosives are stowed in the 5 holds. Furthermore cars, airplane parts as well as cement bags and other building materials.
The Umbria's route takes it via Messina in Sicily to Port Said, from where it is to sail through the Suez Canal and the Red Sea to East Africa.
After entering Port Said on June 3, she bunkers another 1000 tons of coal and 130 tons of water. Here 23 British Navy soldiers as well as 2 pilots board the ship. In view of the imminent entry into the war between Italy and England, the Channel passage is deliberately delayed. So the "Umbria" leaves Suez with her explosive cargo only 3 days later.
From now on, the gunboat "Grimsby" pursues her. It stops the freighter at Port Sudan, claiming that she is in British territorial waters. As a result, the "Umbria" drops anchor at Wingate Reef on June 9.
Under the pretext of searching the ship for smuggled goods, 22 soldiers from the New Zealand cruiser "Leander" are brought on board under the command of Lieutenant Steves. They immediately occupy the strategically important points and begin a time-consuming search.
In the afternoon, Captain Muiesan learns over the radio in his cabin that Italy will declare a state of war at 7:00 p.m. and that the first acts of war are to be expected from 0:00 a.m. the following day.
Muiesan realizes that he cannot lose any more time, so that the strategically important cargo does not fall into enemy hands. Together with first officer Radolfo Zarli and flight engineer Carlo Costa, he plans the sinking.
They have difficulty evacuating the crew without attracting attention.
Finally, Muiesan suggests to Lieutenant Steves to carry out a rescue exercise, which the Lieutenant approves in the hope of being able to detain the "Umbria" even further. While the Italians begin the exercise, news reaches Steves on the bridge of severe water ingress throughout the ship. After a few minutes and with the increasing list of the ship, he realizes that he can no longer prevent the sinking.
On board the "Gimsby", Muiesan informs him of Italy's entry into the war and that he had given the order to sink the ship himself.
He then goes with his crew to India as prisoners of war before the outbreak of war.
Shaab Suedi
At the northern end, the wreck of the "Blue Belt", which sank in 1977, lay outside the reef. The ship's cargo consisted of "Toyota" brand passenger cars and trucks, hence the name "Toyota Wreck." It was en route from Jeddah to Port Sudan - the cause of the sinking has not yet been determined.
Unfortunately, the Blue Belt slipped off the reef in the summer of 2013 and has not been able to be dived since. The spot where the wreck was for so long is identified by cargo remains on the reef. Nevertheless, a dive in the area is worthwhile. At a depth of 5 - 40 m the reef offers an incredible variety of corals, big napoleons and manta rays are at home here. If you dive to the north, you will reach a beautiful coral garden with hundreds of table corals in all sizes and colors.
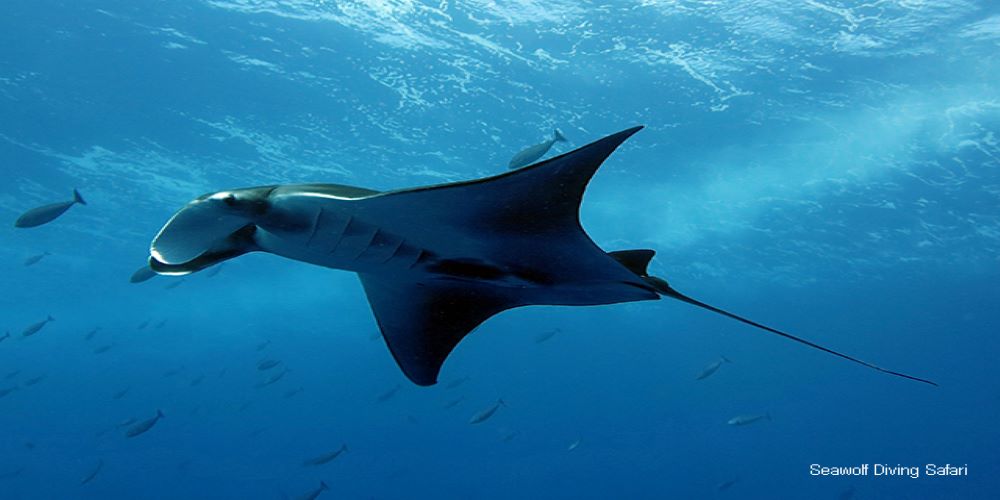
Mesharifa
This lagoon is filled with large manta rays attracted by the extraordinary abundance of plankton. Especially between August and November, these fascinating creatures form groups of up to dozens. They congregate near channels and passages where the current brings them large quantities of food. As in any area filled with plankton, visibility here is not very good. Therefore, to get good photos it is necessary to get very close to the animals (often they swim close to the surface).
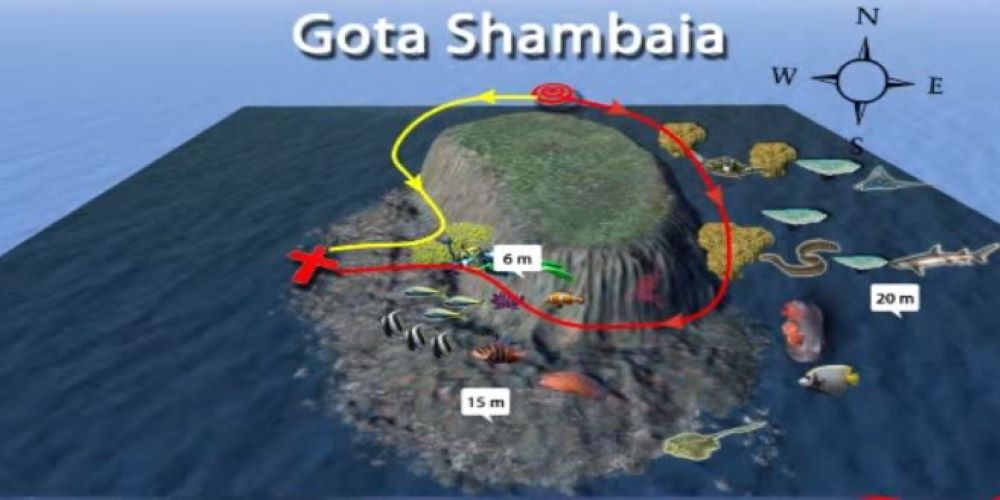
Shambaia
Slowly you gain depth and dive right shoulder along the reef. Here it can already come to encounters with white tip reef sharks.
The reef slopes gently and without current you can dive around the many boulders. Hard corals in great variety, beautiful intact table corals and nice growth. Just before the mooring you can see a block that looks like a huge mushroom. This block is covered with beautiful soft corals that shine in shades of purple, white and blue. It is worth looking closely to spot the small flatworms from the variety of colors of the growth. A large school of barracudas also crosses the way here and amazing is the calmness of the predators that the diver can approach up to a few centimeters. Under the boat you dive at the reef wall in 5m depth or stay under the boat and spend the remaining time in a swarm of black spotted sweetlips.
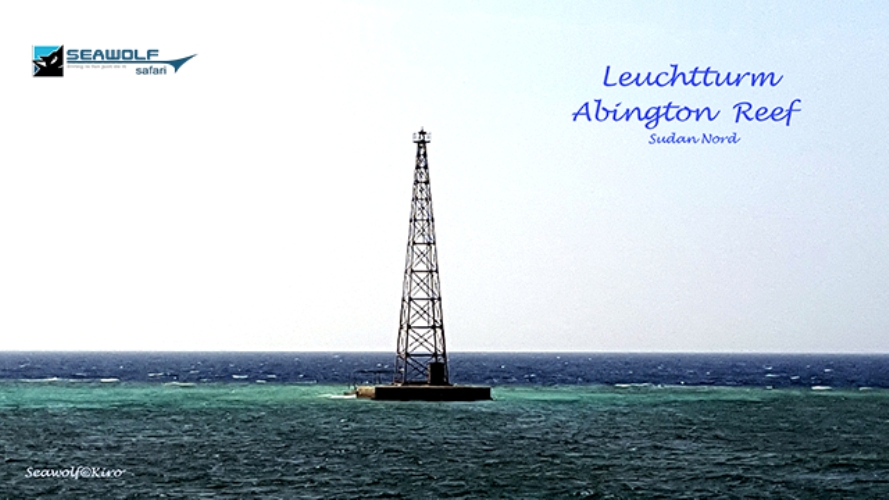
Abington Reef
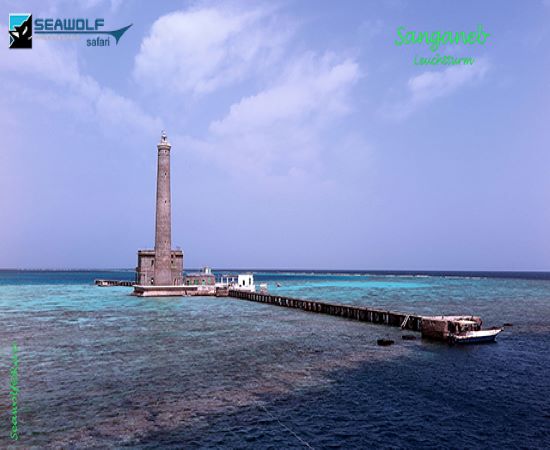
The Abington Reef has a triangular shape and slopes almost vertically down the sides. The corners are joined by plateaus of different sizes. The largest and most lush is the western one. The reef is easy to spot from afar thanks to its unmanned 30-meter high lighthouse. It consists of a metal framework standing on a rectangular concrete foundation. The tower serves as a resting and feeding place for seabirds. The chopped up tritonshorn snail shells at the base of the tower bear witness to this. At night, the signal light can still be seen at a distance of 20 nautical miles. Due to the exposed location, strong currents must be expected.
South wall with west plateau
The reef wall drops vertically on this side at depths of 20 to 25 meters and turns into a slope below. In shallow water up to 4 meters it is covered with small canyons, overhangs and tunnels. This section also invites snorkeling.
In the deeper part of the reef wall, large groupers lie in crevices. Shoals of vermillion seabass keep close to the reef. There is little else of interest to be found in the crevices, but the incoming rays of the sun often create a bizarre sight. Soldierfish seek cover in the caverns, some of which are quite large.
Below the slope begins a drop-off, on whose vertical wall huge gorgonians stick their fans into the current. The west plateau extends in a range from 25 to about 30 meters. The end drops off steeply into the deep blue. At its base is a large table coral, under which there is usually a large grouper. The bottom is covered with smaller coral blocks, between which one or two whitetip reef sharks rest from time to time. Striking are the numerous wire corals. A large school of barracudas often circles above the plateau.
North plateau with west side
The plateau consists of two levels. The upper one is at 5 meters, the lower one at 15 meters and descends rapidly to a depth of 25 meters. It is beautifully overgrown and covered with larger coral heads. On the outer edge patrolling whitetip reef sharks or grey reef sharks can be encountered.
On the plateau there is often a strong current, which makes it difficult or impossible to stay. In this case the dive can be continued relaxed on the not so current-rich west side. The reef wall drops vertically to 35 to 40 meters. It ends in a small slope under which a drop-off begins. It extends beyond the recreational dive limit. The wall is covered with numerous leather corals, and at the southern end a small group of napoleons make their circles. At a greater distance, shoals of spiny mackerels pass by and offer underwater photographers a nice subject.
East side with southeast plateau
Because of the current on this side a drift dive is possible. If the current comes from the south, you start at the small southeast plateau. This drops quickly down to 35 meters and then turns into a vertical wall with many gorgonians.
The eastern side of the reef is very craggy and offers its inhabitants numerous opportunities to seek shelter. Shoals of blue-striped snapper and spiny mackerel stand in the current. However, the diver should definitely not miss to peek out into the deep blue. Large pelagic fish, such as hammerhead sharks or gray sharks pass by here.
Itinerary
ATTENTION: The tour description is only a suggestion. Which dive sites are dived on the tour depends on many factors, including wind and weather.
Arrival
After arrival in Port Sudan transfer to the boat.
Check in, dinner and spending the first night on board in the marina.
Departure
Departure in the morning.
Familiarization of the boat,
Diving, safety and equipment briefing.
Dive at Shaab Suedi and Qita El Banna
Night dive if possible
Angarosh Reef
Dives at Angarosh Reef
Abington Reef
Night dive if possible
Precontinent II
Dives at
Merlo Reef
Qita El Banna
Precontinent II
Night dive at Precontinent II
Shaab Rumi
Two Dives at
Shaab Rumi south
One dive at Precontinent II
Night dive at Shaab Rumi
Sanganeb
Dives at
Shaab Rumi south
Sanganeb west
Sanganeb south
Night dive at Umbria
Return
Two dives at Umbria
Return to the port
For safety reasons you should not dive 24 hours before your flight home.
Check out
Breakfast and departure.
Transfer to the airport.